Converting FileMaker Data to SQL Server
FileMaker is a subsidiary of Apple, attempting to keep the Mac relevant in the data world. This is something that the Windows world just dominates and does very well (and it's a well-deserved compliment to Microsoft and the Windows world). However, in true Apple fashion, the FileMaker database stores data in a "non-standard" fashion (I say non-standard in quotes because every database has its own flavor on just about everything DB-related. However, FileMaker is...how shall I put this...more non-standard than usual.). This adds additional complexity and headache.
Why SQL Server?
Similar to my Paradox DB post, the goal is to convert the FileMaker into SQL Server and then write scripts against SQL Server to ultimately convert and transform the data. SQL Server is serving as staging.
Steps
Note: Must have installed the ODBC drivers for FileMaker, which are included on the FileMaker database install disk. They are called DataDirect SequelLink.
Note 2 (This is the big one!): Must open the database on the computer that is doing the conversion. FileMaker will not accept connections from outside of localhost.
1.) Open the database in FileMaker and turn on ODBC/JDBC sharing (in File >> Sharing >> ODBC/JDBC Sharing Settings). A user configured in that database must be able to connect via ODBC/JDBC.
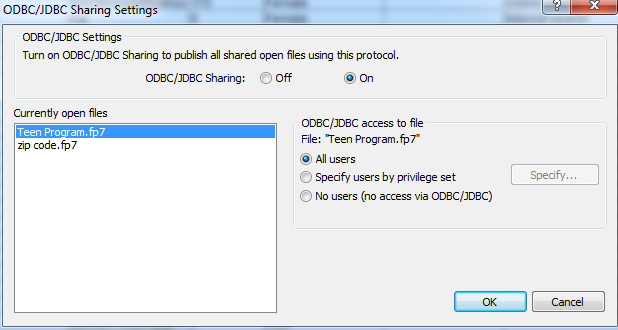
FileMaker ODBC/JDBC Configuration screen.
2.) Configure the ODBC DSN. Data Source Name and Description can be whatever you want. SequeLink Server Host and Port must be what's below. Server Data Source is the file name of the FileMaker database (note that any spaces or other characters must be replaced with their percent encoding character). If everything works, you will get prompted to enter the username and password to authenticate into the database. You may also get prompts to allow incoming connections through your computer's software firewall (port 2399 specifically), which is another sign you've done it correctly.
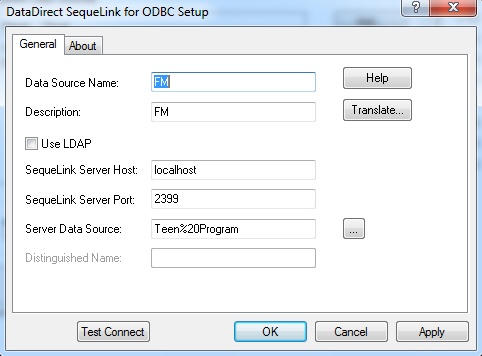
ODBC Configuration
3.) I use SQL Server Management Server to get the Import/Export Wizard up (Right-click on the database you want to import into and choose Import Data).
4.) Use the .NET Framework Data Provider for Odbc and enter the Dsn as the name you setup in Step 2. You will also need to append the DSN string that is being created with what is below. Then the Import/Export Wizard will parse the string so that it looks like the following. The destination database will be SQL Server.
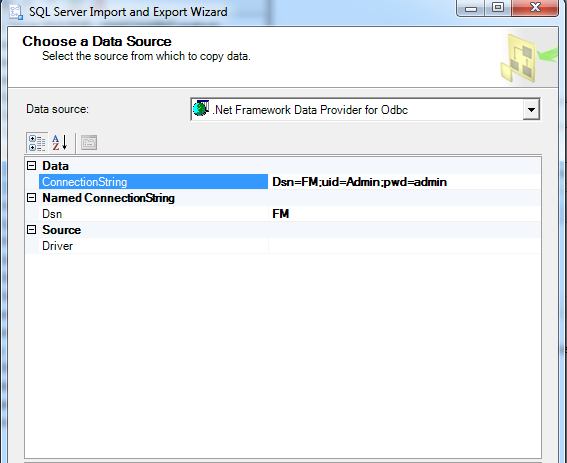
Configuration of DSN for Import/Export Wizard.
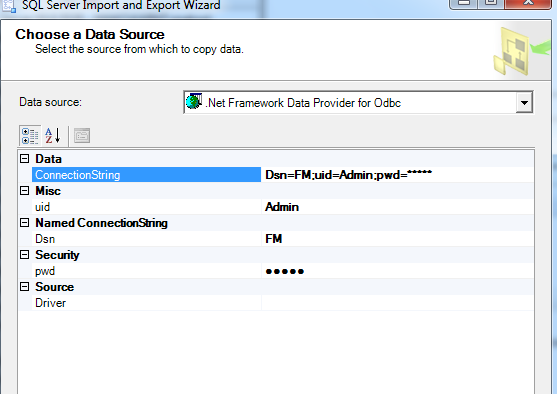
After modifying the DSN string, Import/Export Wizard parses the info out to look like the screenshot.
5.) You will get a list of files to import based on the tables in the FileMaker database. This is where the oddities of FileMaker shine (or not). In FileMaker, every field can take in 2 GB of data. When the Import/Export wizard tries to map the fields, it can't. Since SQL Server is just for staging, make every field nvarchar with a size of max (SQL Server 2008 or greater). If you find that after conversion that only the first character imported, try just varchar, the non-unicode variant.
May the importing gods be with you.